CTC Studio

Play with light, You might like it, You never know...

The Almanac - Page 2 - Metering & Exposure

Published by Hari Kumar Balasundaram under , , , , , , on 5:16 AM
"I'll just fix it later in Photoshop." - If this is your most used phrase while taking pics – think again!!! Photography is not always about editing and post processing alone – Softwares such as Photoshop have become a very bad prop for good unblemished photography so to speak. You can never completely save an over or under exposed pic using an image manipulation software.

A perfect exposure is the Holy Grail of every photographer. Although, there is no one right way to accomplish perfect exposure, obtaining the right amount of exposure depends on four factors –

• Factor 1: Amount of light incident on the subject
• Factor 2: Amount of light reflected from subject into camera lens
• Factor 3: Amount of light passing through the lens onto the film
• Factor 4: Sensitivity of the film/sensor being exposed (ISO)

Factor 1: is controlled by the intensity of the light source – mostly the Sun on a broad daylight for instance and whether anything is blocking this light – trees, buildings & clouds for example. The position of the Sun at various times of the day vis-a-vis the subject’s position, whether the subject is lit from the front or the back or some of the subject may be in a shadow.

Factor 2: is simply controlled by the reflecting nature of the subject – snow or white coloured clothing for example reflects more light towards the camera than a dark subject such as coal or black stone for example.

Factor 3: is purely controlled by the camera settings – a slower shutter speed or a larger aperture allows more light to fall on the film / sensors

Factor 4: in simple terms is the ISO of the film / sensor.

Whilst taking a look at the four factors – we can easily ascertain that the photographer can control only factors 3 & 4. To simplify – Using an ISO of 100 - let’s say for a broad daylight – the photographer will have to set the shutter speed and the aperture to balance out the effects of factors 1 & 2. How can you best measure the factors 1 & 2 to set the shutter speed & aperture.

The simplest and the easiest way to understand this is to use the automatic settings in your camera – the camera’s inbuilt light meter measures the light incident on the subject [ factor 1] and the amount of light reflecting from the subject [ factor 2] and sets the shutter speed and aperture accordingly.

But here comes the trick question – how can the camera possibly know that the subject its shooting is either snow or a person clad in white clothing or dark clouds in the horizon. To choose the camera’s settings – the light meter in the camera has to make an assumption that the subject is neither too dark nor too bright and that the subject reflects a medium level of light – 18 % reflectance – the midpoint between white n black in the luminance values.

“What the hell” is exactly the thought that would have propped in your mind right now and I know this sounds too techie – but let me explain a bit ..
-----------------------------------------------------------------------------------------------------------------
What you see there is a nice scene of some fishing boats, with a good tonal range, plenty of colour and some nice late-evening sunlight.


What your camera’s light meter sees is this:

Try this tutorial for yourself: copy the fishing boat scene onto your hard drive. Start up your image editing software and open both pictures. Light meters only see in black and white, so reduce the saturation of the fishing boat shot to zero. Next, add a Gaussian blur set at its maximum level, so that the whole picture is reduced to a field of grey. Use the eyedropper tool to measure the RGB colour value of the resulting tone. You should find that it is a mid-tone grey with an RGB value of around 127,127,127.

It’s an interesting and curious fact that any average scene reflects 18 per cent of the light falling on it. Look out of your window, and unless you live in the Arctic or the Antarctica the scene you see is reflecting exactly the same amount of light as the scene out of my window. That 18 per cent reflection is exactly the same as a mid-tone grey, mid-way between black and white.

Light meters are calibrated with this fact in mind. When your camera takes a light reading, the meter averages the scene and adjusts the exposure to produce that mid-tone grey (or 12 per cent luminance, but that’s another discussion altogether). If you point the camera at a black stage curtain, it will try to make the black into a mid-tone grey, so it will over-expose. If you point it at snow it will try to make the white into grey, so it will under-expose.
-----------------------------------------------------------------------------------------------------------------

Therefore - Our camera’s light meter whilst shooting a snow covered mountain – would simply adjust to have a medium level of light present as detailed above and therefore snow would appear grey and not snow-white realistically speaking.

Now what if the camera were to focus on the volcano – the rocks would simply be too dark and the camera’s light meter would also adjust here for 18% light and shall render the volcano also as grey and not black as the case may be ..

What if the Sun whose light is reflected by the snow and the volcano is suddenly covered by clouds – although the sun’s intensity has not reduced – the incident light does not reach the snow or the volcano and therefore the reflectance has changed.

In each of these cases – the camera’s exposure setting either is over or underexposed

Now - Imagine if you were to focus the grass incident on the ground with the volcano, the camera would return medium light values as the grass is devoid of such high reflectance as snow or volcano and therefore offers a perfect exposure setting for the shot.

The above setting offers a clue to obtaining a correct exposure – i.e. Under a given lighting condition, meter off a subject of medium brightness to select shutter speed and aperture and then use these same settings to photograph subjects of different reflectivity.

For eg. At a given ISO of 100, if the automatic settings of the camera were to return values of shutter speed of 1/125 at F 22 . But to make the snow whiter – we need to choose either F11, F8 or F5.6 but which one .. By metering on the grass below – the camera now adjusts for the right medium values as F11 at 1/125 secs. By shooting now at F11, we are now telling the camera that it needs more light to shoot a snow covered volcano for a perfect shot i.e ...

Similarly for the volcano – the camera might select F5.6 at 1/125 sec for a grey toned volcano and to make this dark – we would need to reduce the exposure of the sensor. This can easily be done by metering off the grass which would return values of F11 at 1/125 of a sec. If we were to shoot the volcano now – the colour of the volcano would return dark and this would be a perfect exposure.

We have just discovered that be it shooting the snow or the volcano – the correct exposure is F11 at 1/125 of a sec.

With this understanding – do you really think that the reflectivity of the subject has any role to play in the exposure settings. Actually speaking – the reflectivity of the subject is important in one sense that we need to capture the true nature of light incident on the subject when we are shooting.

But the key is we do not want to negate this effect; we want the reflectivity of the subject to directly influence the exposure in order for the subject to look realistic in the photo. The problem is that the camera's automatic exposure system does negate this effect with its assumption that all subjects are of medium reflectivity, resulting in incorrect exposures for all but medium brightness subjects.

To summarize so far, of the four factors affecting exposure, the photographer only has control over the shutter speed and aperture (factor 3), and ISO (factor 4).

Assuming a given film speed, the photographer must choose a shutter speed and aperture based on the amount of light incident on the subject (factor 1) and the reflectivity of the subject (factor 2).

But as seen above, because we want to realistically portray the brightness or darkness of the subject, the reflectivity of the subject should not really affect the choice of shutter speed and aperture.

Thus, the amount of light incident on the subject remains as the primary factor controlling exposure. Therefore - For correct exposure, we must assess this factor and select an appropriate shutter speed and aperture for the photograph.

we shall continue on our understanding of metering and metering systems in the next blog .. Following up on the temples of Cambodia - Here's our stunning pick of the week by Jeff sullivan
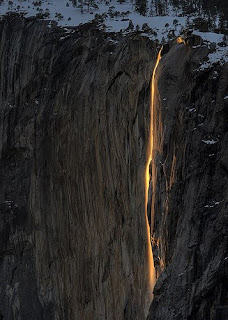
Horsetail Falls in Yosemite Valley is selectively backlit by the setting sun. This was an amazing spectacle to witness. Happening only two weeks out of the year, the setting sun falls behind the vertical face of El Capitan, selectively lighting this waterfall with its orange sunset light. Gradually growing in intensity and color for the last 5 minutes or so, it was like seeing a narrow strip of lava flowing down the face of El Capitan. The weather and the water flows often don't cooperate, I was shut out by a blizzard last year, so I was fortunate to see this on two consecutive evenings this year - Jeff Sullivan

Hari Kumar Balasundaram


0 comments:

Post a Comment